Course navigation
Explore the Micro:bit Hardware
Get hands on with the micro:bit hardware and explore the different parts of the device.
Step 1
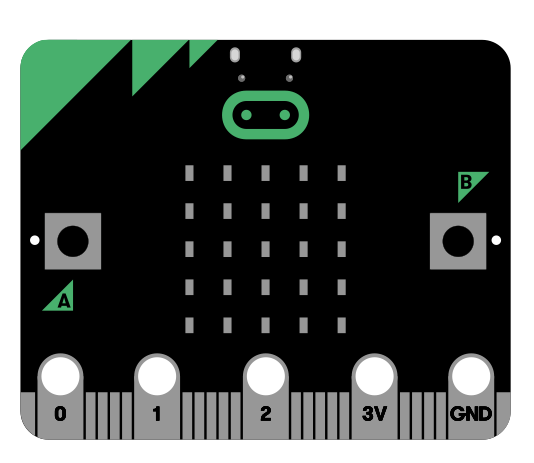
Look at the front of the micro:bit.

Find the 25 LED lights on your device. These are the ‘output’ of the micro:bit. You can turn all these lights on and off and control the brightness.
There are also two programmable buttons: A and B. These are some of the ‘inputs’ for the micro:bit. Try pressing these buttons.
Step 2
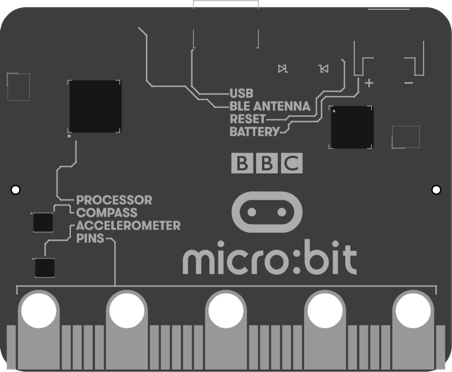
Look at the back of the micro:bit.

On the back, find the 'processor'. This executes all the code. It's designed to be extremely small and energy efficient. Because it uses a small amount of electricity, it can be powered using just two AAA batteries.
Find the 'accelerometer' – it can tell if you move it, tilt it or shake it.
What other devices do you have that use an accelerometer?
Find the 'compass' – it knows which direction the micro:bit is facing and what direction it’s moving in.
What other devices do you use that have a digital compass?
Find the 'Bluetooth Low Energy' antenna' (BLE antenna) – using this, the micro:bit can talk to other similar smartphones, tablets, laptops or anything that uses Bluetooth Low Energy. The micro:bit can send and receive messages from these devices – this means you can have another device control the micro:bit, or have the micro:bit control the other device. It can control your phone, a computer or a drone.
What other devices do you use that have Bluetooth?

Find the pins on the micro:bit. The micro:bit does lots on its own, but it can do even more when you attach it to other devices or add sensors. Connect these using the pins at the bottom.
The micro:bit has a micro:usb connection. Carefully connect it, then disconnect it. When doing this, hold your micro:bit carefully by the edges so you don’t damage it.
The micro:bit also has a battery connection. Try attaching and then detaching the battery pack. Again, do this carefully so you don’t damage the micro:bit.