Course navigation
Create Your Own Web Page From Scratch
Step 1
Now that you know about how web pages work, the best way to learn more is to start from scratch and make your own. We will use a different editor for this lesson, called Code Pen.
Go to codepen.io click Create, and then click New Pen.
Step 2
There are three empty boxes, labelled HTML, CSS and JS. You will put code in these, just like before, to create your page.
Blogs are web pages about things that have happened, a bit like a news report or a diary. Think of something that you would like to write about - it doesn’t have to be true! It could be:
- A holiday
- A book or movie you have seen
- A sport or hobby
- Something that happened to you
Step 3
Give your blog a title. In the HTML box, always start with tags, and the content goes between the tags. A tag is code – usually a word that is inside angle brackets, like <head>. The closing tag has a slash before the word to show that it is the end of that part, like </head>
At the top of the box, write:
<head>
My Blog
</head>
<body>
<h1> My first blog </h1>A blog post about …
</body>
It doesn’t matter if there are any spaces in the code, they won’t show on the web page. For example, this code would show the same thing:
<head> My Blog </head><body><h1> My first
blog </h1>
A blog post about …</body>
Step 4
Add some text to your post about your day. The text will all show as one paragraph unless you use tags to separate each section. Use a <p> tag at the start of a paragraph, and a </p> tag at the end.
Step 5
Start to control the font and colour of the page. It is best to control this with the CSS file. At the start of the CSS box, write:
h1{
font-size: 80px;
}
p{
font-size: 25px;
color: blue;
}
This controls the size and colour of the text on your page. It sets the text size in your heading to 80 pixels, and the text in your paragraphs to 25 pixels and a blue colour. You can change this to make your web page look the way you want. There are lots more options to change the look by using things like:
background-color: lightblue;
You can add a border around the paragraph by using, for example:
border: 25px solid green;
padding: 25px;
margin: 25px;
border-radius: 12px;
You can add a gradient in your paragraph by using:
background: linear-gradient(red, yellow);
Spend five minutes choosing your own text, colours and borders until you’re happy with your page.
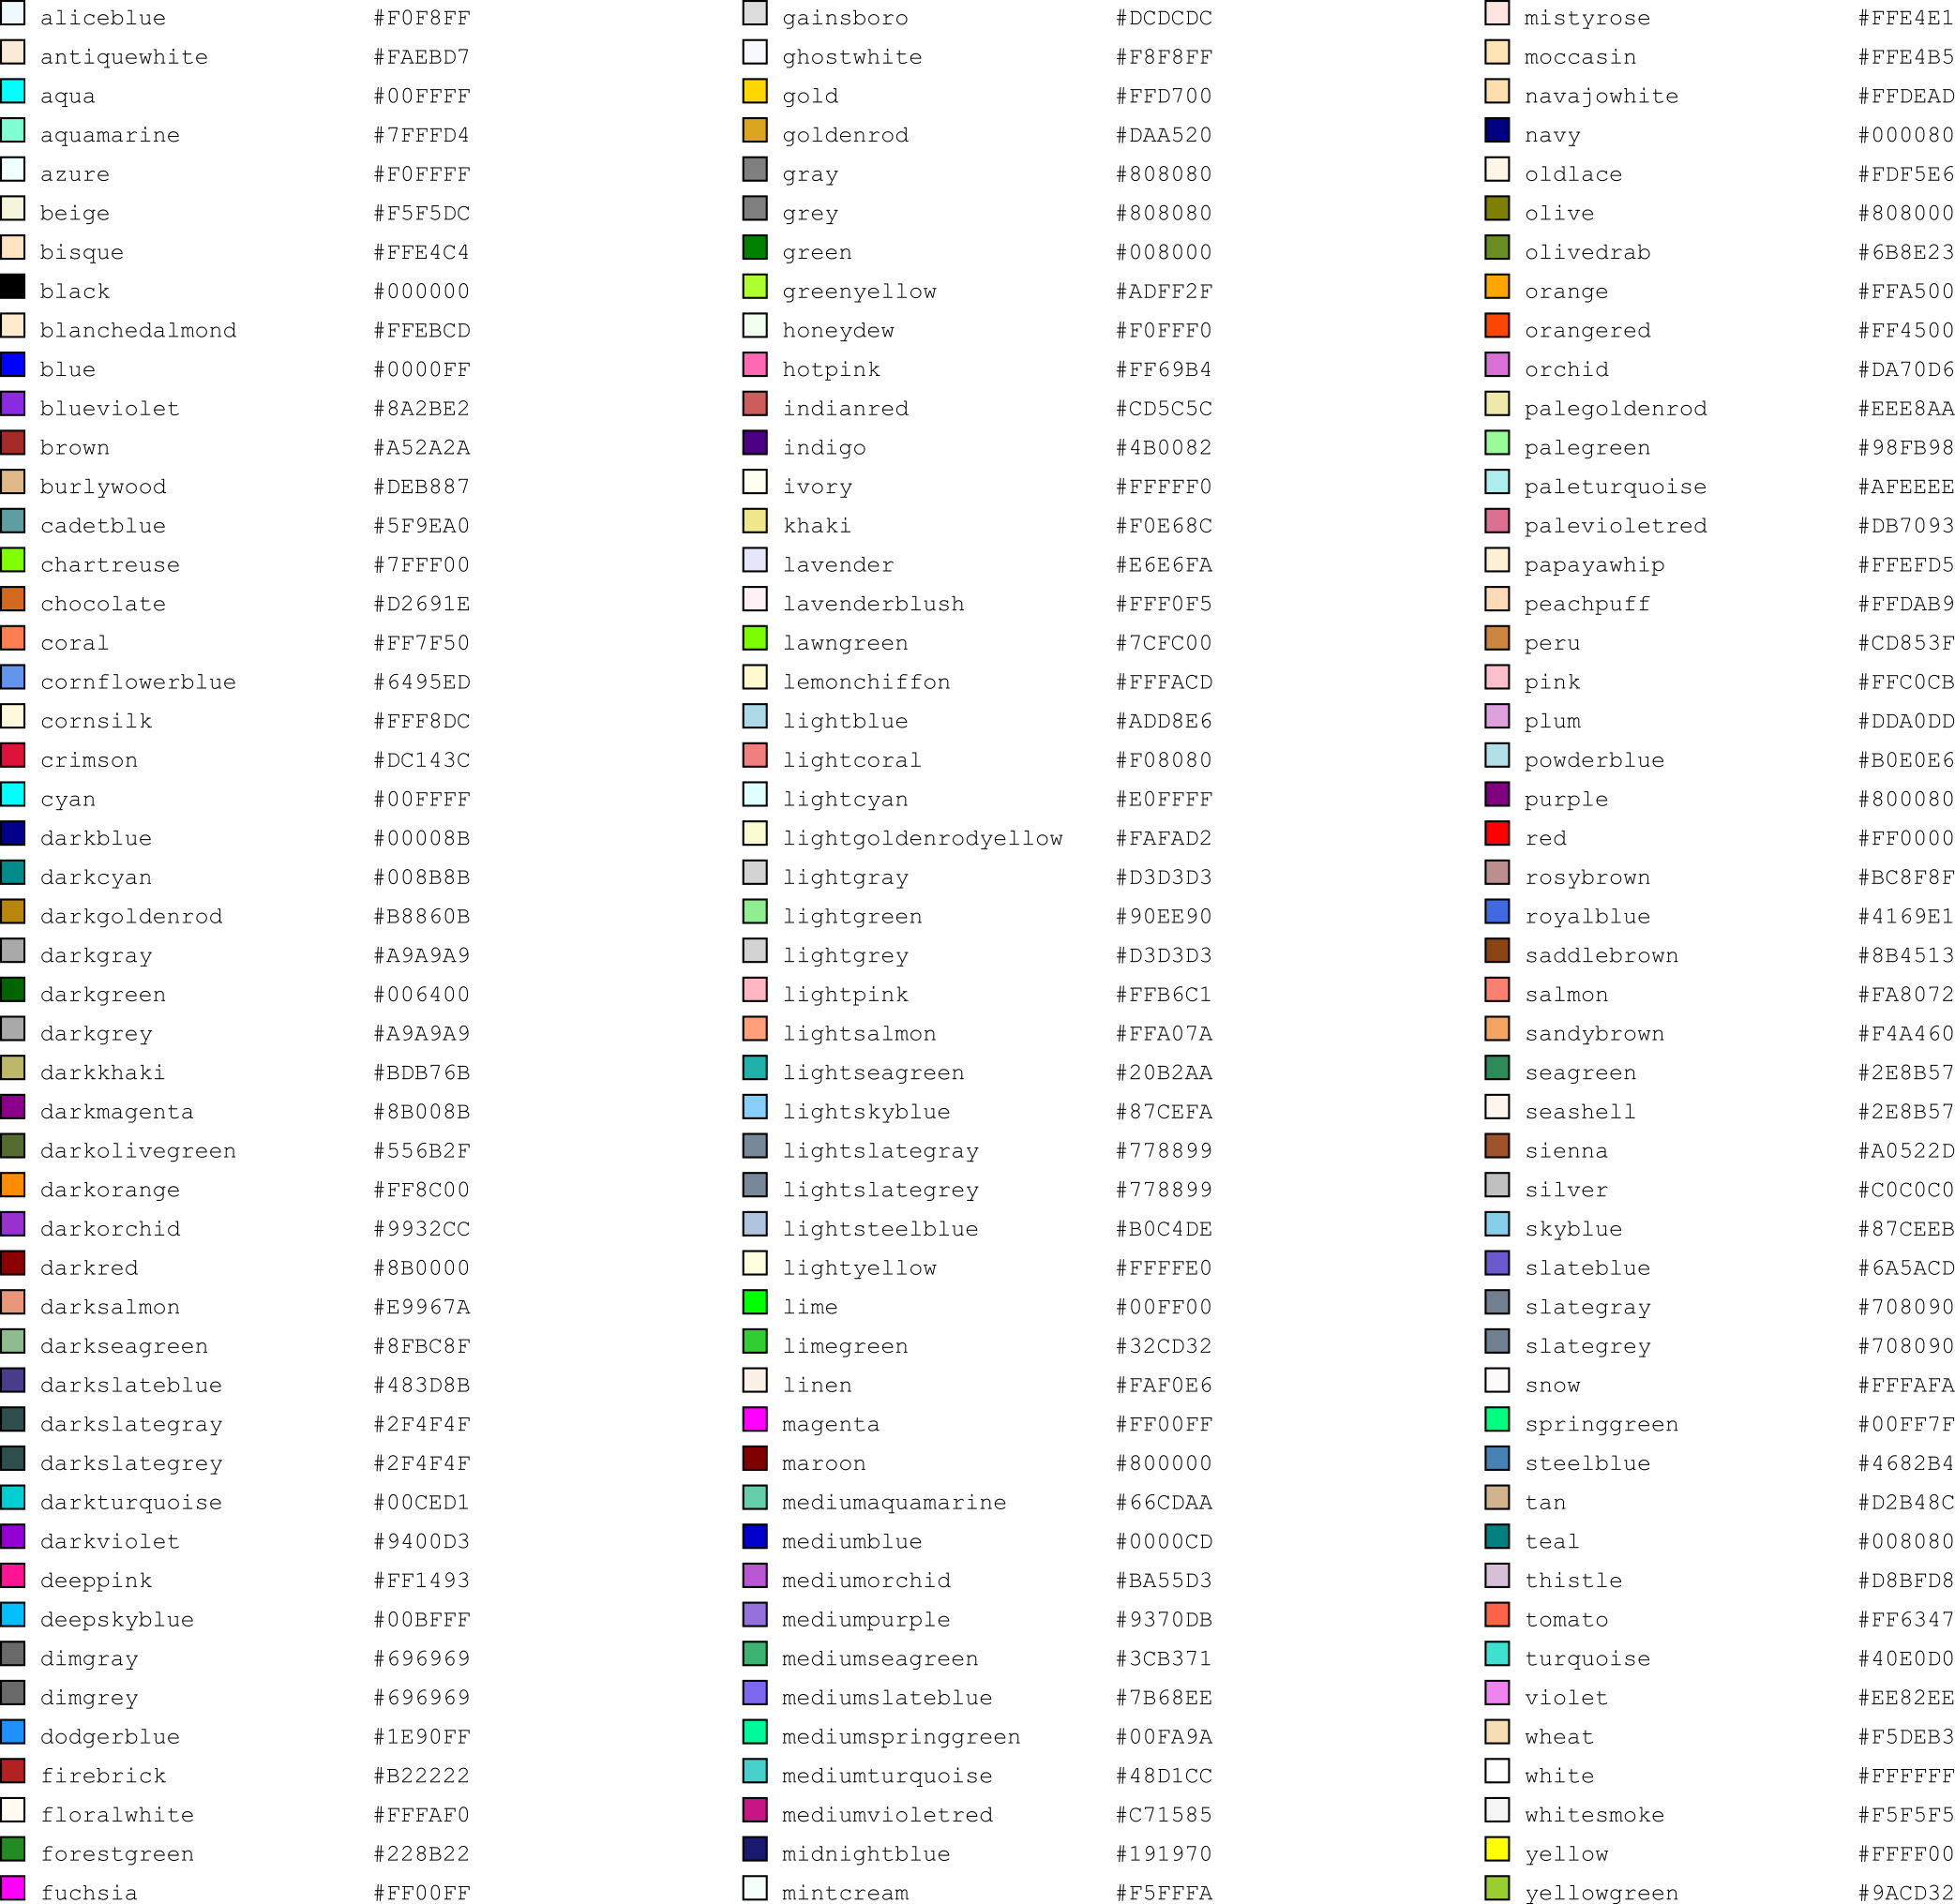
Here is a list of different colours you can use. You can use their name, or their code number, starting with a #.

Step 6
Add some pictures to your blog by finding some pictures online.
Remember to only use pictures that don’t have copyright.
To do this, search for an image on https://images.google.com/. Put in the word you want to search for (like “beach” or “mountains”) then press enter. To show only the pictures that you are free to use, click Tools, Usage Rights, and then Labelled for Reuse.
Once you have found an image you want, click on it once, then click on the button “view image”. Now right-click the image and click on “copy image address”.
Paste the location for the image into your HTML code. An image should start with the <img> tag, but you need to include the location inside the tag. To do this, type:
<img src="URL">
And then paste your image location inside the quotation marks. Here, src means source, so you’re telling the browser where the image is located.
Step 7
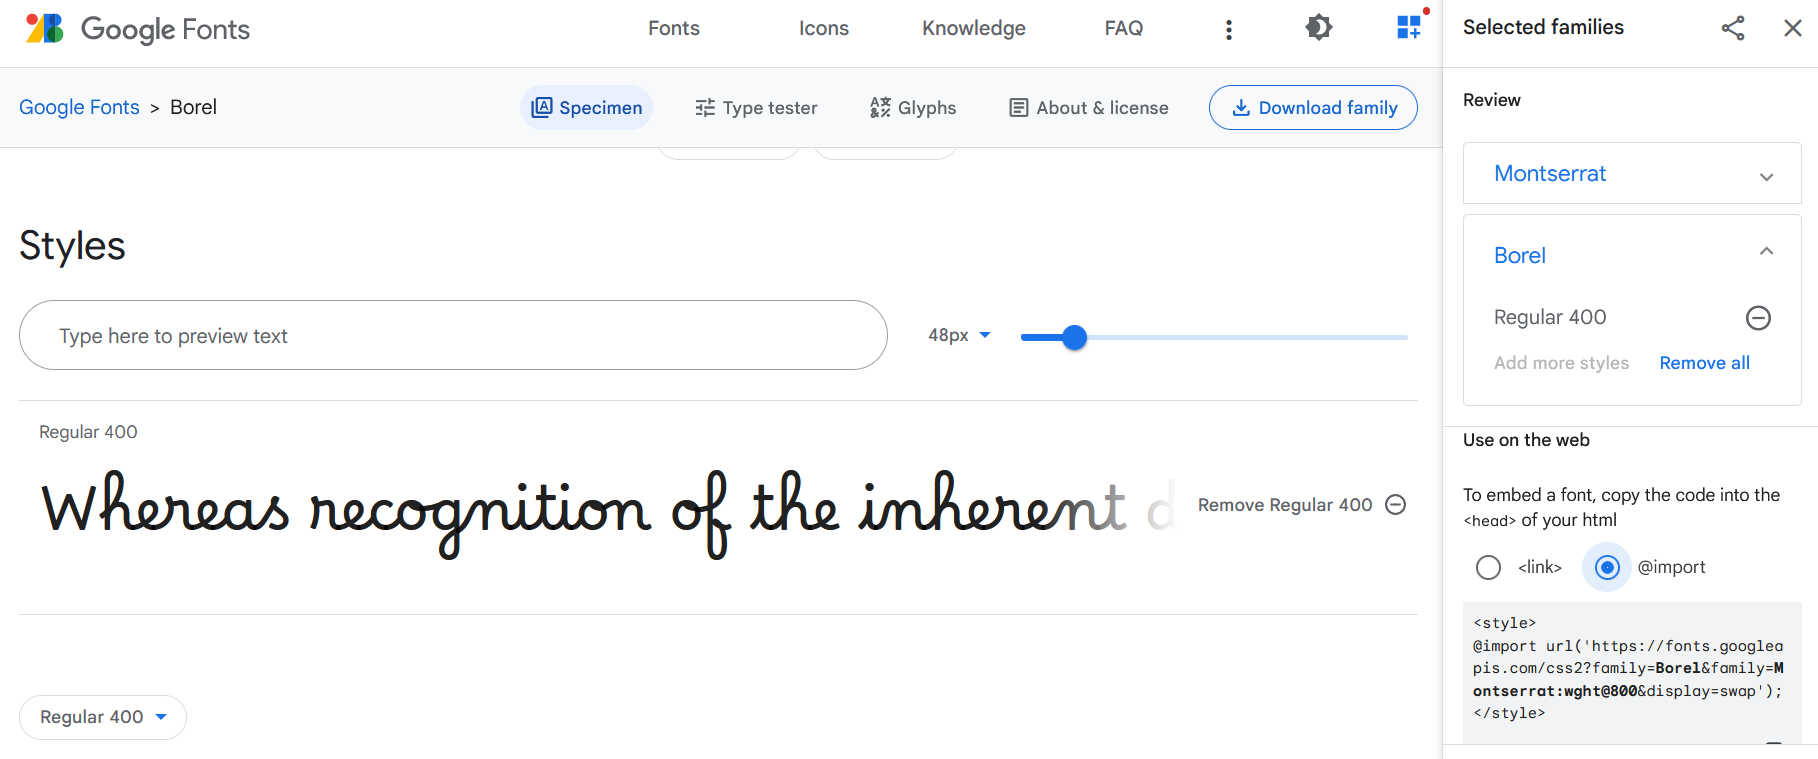
You can also change the type of font like you did in the last lesson. This time, we can import the font in the CSS file. Go to https://fonts.google.com/
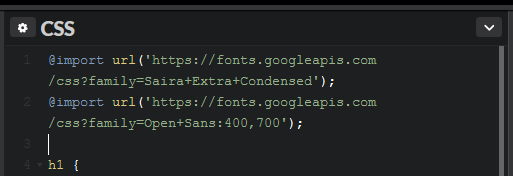
Find a font you want to use, and click the + button on the right. A share screen will appear on the right of the page. You need to use the @import text and copy it to the top of the CSS file. This tells the browser where to find the font to use.
Make sure you copy the part that starts with @import and ends with a semi colon (;)

Now you can use that font in any part of your page. To use it in every paragraph, put the font-family code in your CSS file.

You can use as many different fonts as you want, as long as you import
each one into the CSS file.
Step 8
Try adding some JavaScript code to your page. You can create a button that changes the colour of your page.
In the JS part of the editor, you should create a function that changes the colour of the background.
A function needs a name, so start with:
function colourChange() {
}
Everything inside the curly brackets is part of the function. This function will be quite simple, it just needs to change the background colour. You may be able to guess how to do some of this. This is what the function should look like:
    function colourChange() {
          document.body.style.backgroundColor="red";
    }
This won’t change anything yet, we need to make this function start somewhere in the HTML code.
Step 9
Create a button on the page that uses your function. When you click the button, the background colour will change.
This HTML code will make it happen – put it under the <h1> tag in the HTML file.
    <input type="button" id="myButton" name="Color"
        value="Click here." onClick="document.querySelector('#myAnswer').innerHTML
        = colourChange();">

This code tells the page to display a button, and when it is clicked, to do whatever is in the colourChange() function.
See if it works!
You can also change the text on the button to say something different.
Once you are happy with your page, save it and show it to someone else to test it.