Course navigation
Add a Camera Function
Step 1
Ever wondered how Snapchat works? Well now you can make your own version of Snapchat and draw on your pictures!
In the Designer editor, put a Button component in HorizontalArrangement2 next to the brush size buttons.
Step 2
Change the button name to “SnapButton”.
Design the SnapButton in the Properties pane.

Step 3
Go to the Media palette, drag out a Camera component and drop it anywhere in the Viewer. It will appear in the area at the bottom of the Viewer marked Non-visible components. That’s everything you need in the UI!

Step 4
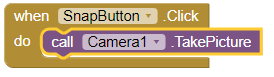
To access the phone’s camera when the user clicks the Snap button:
- Go to the Blocks editor
- Open the SnapButton drawer
- Drag out a when SnapButton.Click event handler block
- Snap a call Camera1.TakePicture block to when SnapButton.Click
Step 5
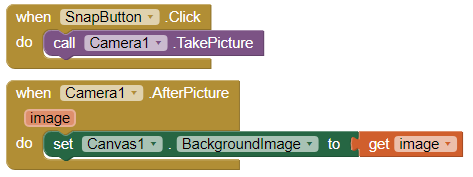
Tell it what to do after a picture is taken: change the canvas to the new photo.
- Drag out a when Camera1.AfterPicture block into the Viewer
- Open the Canvas1 drawer
- Drag out a set Canvas1.BackgroundImage to block
- Snap it to the when Camera1.AfterPicture block

Step 6
Hover the mouse over the when Camera1.AfterPicture block to pull out the get image block. Snap it to the “do” section of the when Camera1.AfterPicture block.
Step 7
Now when the user takes a picture, the image will appear on the canvas and they can doodle on top of it! Try it now! You will need to turn the phone sideways if you want to take a landscape picture.